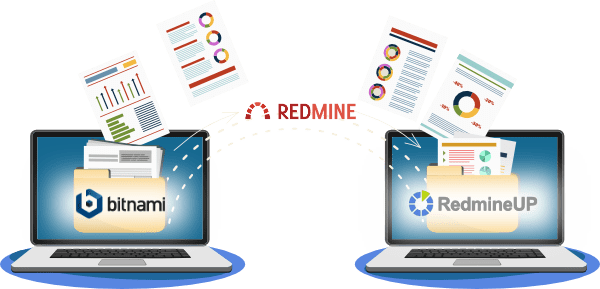
Let's take a look at the process of migrating an existing Redmine server to the RedmineUP cloud.
Relocating a whole service sounds like a tedious and error-prone undergoing, but don't things often seem bigger than they truly are? Read on to gain clarity on the actual steps. .
Reasons to migrations away from Bitnami?
- Reasons to migrations away from Bitnami?
- 0. Introduction meeting.
- 1. Create a cloud account at RedmineUP.
- 2. Prepare a backup.
- 3. Send us the files and check the results after the migration.
- 4. Setup Helpdesk.
Many teams start their Redmine using a Bitnami Redmine, or Redmine + Agile installers because it seems as the fastest way to start. Soon it turns out the Bitnami hosted Redmine is hard to manage, support responds to request slowly, it's hard to update the Redmine or add new plugins.
Teams that used Bitnami to install Redmine on their servers still are vulnerable to data security gaps due to constant updates of Redmine and plugins, supplying a Linux administrator to manage the server, seeking support when a new problem occurs and lack of functionality and customization.
As a number of projects, issues and files increases, Redmine visibly slows down. Your team can face problems with disk storage and limited server resources. You'll need Linux admin skills, knowledge of Redmine, and some Ruby skills to perform migration/update.
Properly hosted Redmine is a effective tool that supports your business.
With RedmineUP Cloud you don't need to hire nobody. With Cloud all administration, system maintenance, and resolving issues tasks are handled by our team of experts. You work on the fast, most recent stable version of Redmine and your data is backed up daily.
The system provides you all:
- Built-in Redmine features (Agile, Helpdesk, CRM and more)
- Fully-responsive and mobile-friendly themes
- Zero migration and setup fees
- Daily backups
- SSL security
- Amazing support :)
0. Introduction meeting.
During a kick-off meeting, we'll connect to clarify any questions, understand your goals and get necessary info about your Redmine. It includes:
- On what day and time do you want us to migrate your Redmine?
- In case you already use our plugins: which ones?
- How many users actively uses the tool?
- How much time does it take to migrate Redmine?
Provided there are no other migrations taking place, our team usually completes the process the same business day, in 3 to 4 hours.
1. Create a cloud account at RedmineUP.
Two things are needed to complete the migration process - a RedmineUP Cloud account and a backup of your current Redmine server.
Registration of your account takes only a minute and doesn't require a credit card. During the sign up you we'll ask you only about your name, a business mail address, a work phone number and to select a subdomain for your instance. A link to your new account will be sent right after the registration.
2. Prepare a backup.
It will be used to restore your Redmine on the Cloud instance. In case you need assistance, our team member is ready and willing to help. You just need to provide a TeamViewer access.
The backup consist of two parts: a dump of your Redmine database and a copy of Redmine attachments files.
2.1. Preparing a database dump
UNIX
Before you begin you need:
- a user with access to run the backup;
- root access to the system, or a user account with
sudoprivileges.
The process differs slightly depending on your database type.
PostgreSQL Database
PostgreSQL provides the pg_dump utility to simplify backing up a database to a single file. This command must be run as a user with read permissions to the database. Replace username with your username and dbname with the name of your Redmine database.
pg_dump -U username dbname | gzip > redmine-backup.bak.gz
MySQL or MariaDB Database
MySQL and MariaDB include the mysqldump utility to simplify the process to create a backup of a database or system of databases. Using mysqldump creates a logical backup. You can only use this tool if your database process is accessible and running.
You need to execute the following command, replacing username with your username and dbname with the name of your Redmine database:
mysqldump -u username -p dbname --quick --compact | gzip > redmine-backup.sql.gzHere’s a breakdown of the
mysqldump command options used above:
--quick: Enforce dumping tables row by row. This provides added safety for systems with little RAM and/or large databases where storing tables in memory could become problematic.--compact: Produce more compact output.
- There is a password prompt password before the backup process starts.
- Depending on the size of the database, it could take a while to complete.
- The database backup is created in the directory where you initiate the command.
A shoutout to our colleagues at Linode for providing these postgreSQL and MySQL/MariaDB guides._
Windows
Before running the commands shown on this part, you should load the Bitnami stack environment by clicking the shortcut in the Start Menu under “Start -> Bitnami APPNAME Stack -> Application console (Windows).
Follow these steps:- Stop all servers using the shortcuts in the Start Menu or the graphical manager tool.
- Create a compressed file with the stack contents. You can use a graphical tool like 7-Zip or WinZip or just right-click the folder, click Send to, and select the Compressed (zipped) folder option.
- Download or transfer the compressed file to a safe location.
- Start all servers using the shortcuts in the Start Menu or the graphical manager tool.
Here you can find the guide how to make Redmine data backup on Windows.
2.2. Preparing a copy of Redmine attachments
In short words, it is an archive of the files folder in your Redmine directory. In Linux you can create one using
$ tar -czf redmine_files.tar.gz [redmine_root]/files
Replace [redmine_root] with the path to your Redmine installation.
In Windows: right-click the folder and select Send to > Compressed (zipped) folder.
3. Send us the files and check the results after the migration.
After you have provided us with your Redmine data and account details, just wait until the scheduled time when we upload your data to the cloud.
4. Setup Helpdesk.
In order to the new server to connected to your current email server, you have to set up the mailbox of your current server to transfer all messages from the mailbox into your specific Redmine address.
For each of your project, a separate mailbox will be generated. To view its address, go to your project Settings - Helpdesk tab at your new Cloud Redmine. To the right you can see the field Forward a copy of your email to this address:
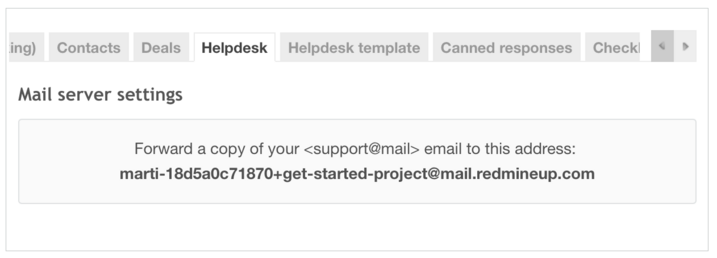
Copy that unique address and set up redirection on your support email for the respective project. Keep in mind, that by default Helpdesk can catch messages with a 10-minute interval. Please see the full guide how to get started with helpdesk.
That's it! Book a meeting with our manager or drop us a message. if you have any questions.