We are very excited to present the new CMS plugin. What’s new? First, look around. Use our site to the fullest. It's build entirely on Redmine with CMS plugin. Now you can easily create amazing websites for free.
Let’s start by saying that we took the core functionalities and almost rebuilt the plugin from scratch, leaving only the true essence. We wanted to give the Redmine Community and you the possibility to create useful and beautiful websites with Redmine. The plugin is still available to download for free. So let’s start the tour! .
The old CMS plugin used to interfere with Redmine and its design. Do you know the best part? Now it works on separate layers independent from internal pages. You can create separate new pages for internal and external pages.
The biggest changes are connected with the logic of creating pages. After installation, you will notice that the plugin has divided the layout of the system into two parts: a left working space and a right column with a sidebar that contains all necessary elements: Settings, Pages, Snippets, Menus, Layouts, Redmine action layouts, Redmine hooks, Redirects, Assets, Global variables. Ready to dive in? Let’s go!
New access to Settings and more options

First of all is the new Settings section. It is worth mentioning Permissions, Localisation, and additionally:
- Setting the default layout of all new pages, including internal pages, such as Issues and Contacts.
- Setting design for error pages, such as 404 and 500.
- Option to add dedicated page fields by default. Currently, they are created empty upon the creation of the page. We will mention later how this can be useful.
In the top menu, you will notice three new options. First is clearing the cache for all pages and refreshing them. Another two will help for many projects or companies that build various websites: Import and Export of websites. On output, you receive all websites exported to/imported from a YML file. You can also export not only all pages with code but also all attachments, e.g., images, files. You can also just export the code with links to attachments to save space.
New Pages
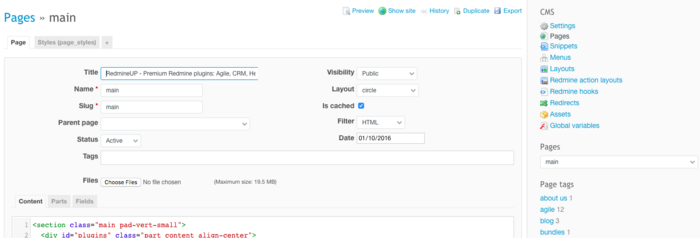
The biggest changes come in the Pages. They start with new logic and structure. You could create reusable parts before—sections that could be displayed as part of different subpages. Now parts are assigned only to specific pages and cannot be used in another subpage. But don’t worry. We did not eliminate this possibility—just reframed it a little bit. It comes under the Snippets with more flexibility. Read along Layout for how each page can be customized. Take a look at different views on our main page, plugin page, with an example of Agile plugin, or RedmineUP Cloud page.
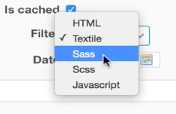
You can also choose a different type of content provided in the page source code. We decided to choose a range of filtered preprocessors: HTML, textile (as in Redmine WIKI), JavaScript, Scss, and Sass.
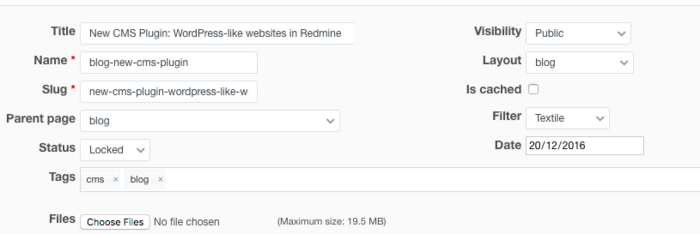
We have also added an option to add a date. This solution is perfect for blogs or a news section. The next point is Tags that can be used for filtering or selecting the pages. You will also notice Fields. They can be added to the page and later utilized in the code to save you the coding effort. Field “Name” is the page ID inside the CMS. Moreover, Slugs. What’s that? It’s a field to create an SEO-friendly URL of the page.
The page can be cashed. It is very useful for pages that require calculations, handles many incoming requests, contains lot of files or images, and so on. Easy-to-use snippets.
The Preview Feature with History
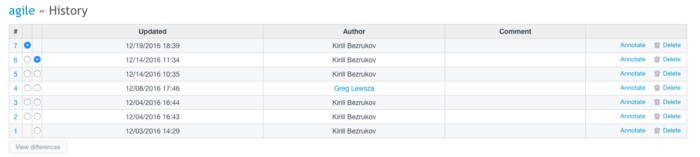
You can preview the currently edited version of the page and also check the previous one. If necessary, you can also compare it with different versions, thanks to the History. It is a brand-new feature in the plugin, similar to Redmine Wiki History. I need to point out that it works for all CMS objects—Layouts, Pages, Snippets, and Parts.
Snippets
Remember the reusable Parts from previous versions that we mentioned earlier? That is now the basis of this new concept. A Snippet can be anything: code, CSS, HTML, JavaScript, Liquid, or something else. It can use page data, such as a page name, and so on. For example, you can create one universal “order form” that is created once and then used on the products page. On each page, it will take page data and generate a dedicated form for each page and each product with its data. They are also very easy to use with just one line of code! Another example would be a snippet for Google Tag Manager or Google Analytics code. Instead of editing scripts on every page or Google analysis code, you can just add a snippet that contains the required code and then use it ( yes, just one line of code! ) on other pages. In case you need to make any changes, just edit the snippet, and the inserted code in the pages that contain the snippet will be automatically refreshed.
Layouts
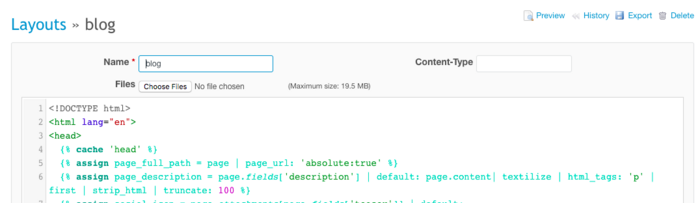
Say hi to a brand-new feature. You can create different layouts to use for various pages. Creating a new layout is similar to building Pages. You can also include page parts and page fields. The best part is that you can create any output you wish: be it HTML, XML, CSS, textile, or another file format. What does it mean for you? That you can make a rich layout that would use HTML and CSS and also RSS or XML feed for a blog.
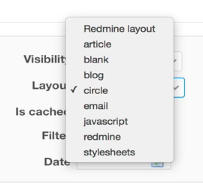
Redmine Action layouts
This is an advanced feature for users or admins who are well accustomed to the Redmine core structure, actions, controllers, and specifics. If you need to change the layout for specific pages inside the system, for example, Issue list, Issue view, Gantt View, or something else, you can use the Redmine Action layout. It is Ruby-like function based on using Redmine’s actions and controllers. For a specific condition and particular action, the system will show a different layout. We used this feature to build the user-friendly Help and Support section, which is build entirely using our Questions plugin.
Menus
Menus are the same as in the previous version. You can change it for internal pages, such as Intranet. You can see an example in our demo: It does not influence the External page menu.
Redmine hooks
Hooks are code blocks used for internal Redmine pages, such as for scripts that do not require the layout to be changed.
Redirects
If you renamed or replaced an existing page, you can redirect the path of the system to the new page with the new Redirect function. Another example is replacing the default projects page with the new one in a rich layout using HTML, JavaScript, and pictures. Moreover, it can be used to build cleaner ULRs because who likes long and clumsy URLs? Exactly!
Assets
These are globally and locally available attachments.
Global variables
These are variable that can be used within the pages. Do you want an idea how to use it? Instead of inserting an “order placement’ link on every page (as it will be unique for page and products or services), we created a single global variable. It is used on the page, takes the products ID from the page field (which is connected with our Products plugin, from which it takes data automatically), and makes the link autonomously, without any effort.
Stylesheets

Just take a look at how clean and organized it looks. One place, just a few tabs. How are they created? Simply by using layout and CSS preprocessor.
More information you can find in the CMS plugin documentation
Uff! Reading is over. We encourage you to download the CMS plugin and start building sites today. Even if it seems hard to comprehend, after a few moments you will get along just great and build all upcoming sites faster, easier, and with more joy. Let’s face it. Now, with better ways to implement eye-friendly design, Redmine can be fun! We cannot wait for your comments and remarks on the changes in the comment section.