
We received many questions about settings of CRM plugin and gathered them into a today’s post. We will guide you through a few steps to make your use of CRM plugin more comfortable and help you keeping track of your sales in Redmine. .
Users and Contacts
The biggest confusion and most common question regard the difference and connections between Redmine users and CRM contacts. It is not one and the same. These are two separate objects. They can be connected if the user will be registered in Redmine using the same email address, which was added to CRM contact.
In other words, adding a contact is not equal to creating a user. Creating contact does not create the user, but if the user registers with the same email as a contract, then they will be linked together.
There are also few little settings we would like to discuss.
Enabling access to contacts in all projects.
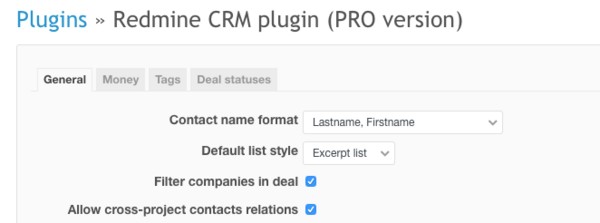
To be able to see all contacts in all of your projects, you need to go to the settings of the plugin (Administration -> Contacts -> General tab) and tick the field “Allow cross-projects contacts relations”.
Adding contacts
Adding “Contacts” to your top menu is not enough. If you go to that tab with the purpose to add a new contact, you will not see the “Add Contact” button. This is because each contact is by default assigned to an individual project. So, if you just navigate to the Projects, and inside the project go to Contacts tab, you will see the longly awaited button.
Importing users as contacts
To see all relevant contacts in the selected project or all of them you need to follow few simple steps. The easiest way starts with exporting all users you want to add, into CSV file. Then open the file and add all relevant columns and values you would need in the CRM. Next, proceed to the specified project, into the ‘Contacts’ tab and import the file. Choose the file, and in the second step match the fields from the file with Redmine fields. Now let the Redmine do its work. If you want to see all contacts in the projects, simply follow the instruction mentioned before to "Allow cross-projects contacts relations”.
Adding additional currency

Just go to plugin settings, into the Money tab. Now, simply add a three-letter symbol of each currency, separating them with comas.
Deal statuses
Adding custom statuses to Deals is pretty simple tasks. You just go to plugin settings into ‘Deal statuses’ tab. Here add all statuses you need, rearrange them in the desired order and change their colors.
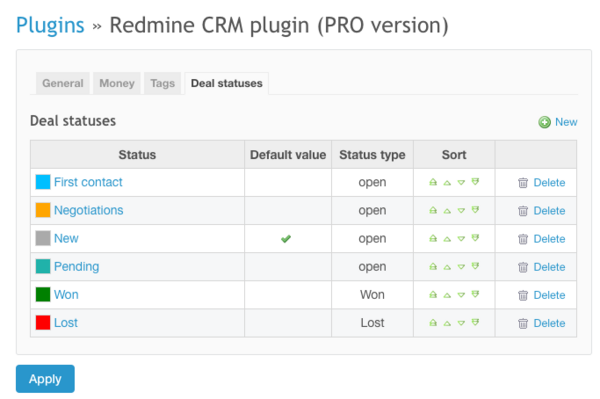
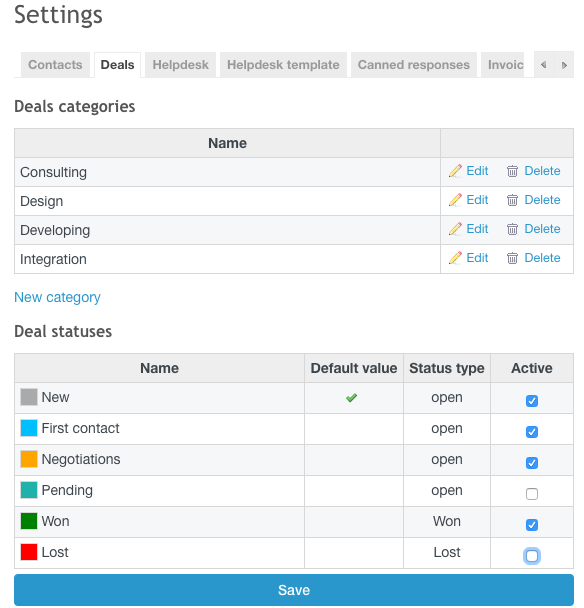
But!:) To be able to use them, you have to go through the last crucial step. By default, freshly added statuses are not visible by default. You need to activate them to the particular project(s). To do so, go to Administration -> Projects -> Select the projects -> go to ‘Deals’ tab, and then activate the statuses you want to use in the certain project(s). It is designed to allow you to be able to use different statuses for various projects.
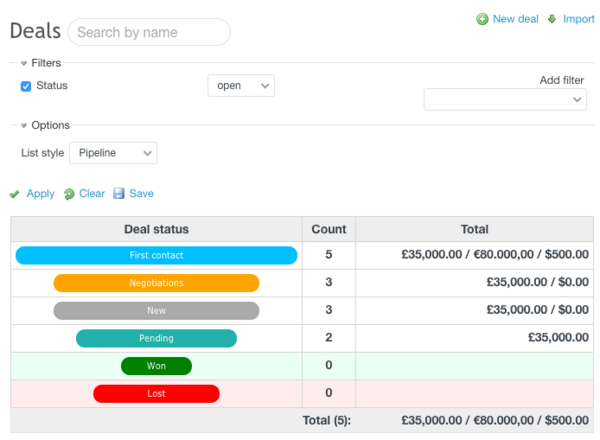
Sales Funnel
With this great feature can see the efficiency of your sales process and predict expected income. You have access it in the right panel. You can also go to Deals tab, and in the Options section, below the Filters, switch the style of displaying the list into 'Pipeline'.

Sales funnel tracks an overall number of deals in each stage. It represents all Deals that are or ever were at that stage. It let you see the current state in a second.
We wait for your comments and feedback! Share your opinions in comments below. If you have any ideas what would you like to hear next, just drop us a mail or comment ;)