
In this week’s post, we discuss a useful feature of using emails with Redmine in your everyday work, communication, and tracking projects to help you be more efficient. We will show how to use email commands to update issues and how to configure email to be able to reply or comment on issues without logging in to Redmine. .
Did you know that by default with activated receiving and sending emails you can receive notification on any changes made to issues you observe or are involved in during communication? Wait, there’s more. You can also comment on them or update their parameters with simple commands sent from within the email message. Yes, you just send an email, and the issues are updated. Moreover, with the Helpdesk plugin, you can comment and also send notes directly to the person who created an issue (or ticket).
Before we start, a few settings in Redmine need to be made to work with email correctly. Please follow the instructions on how to set up receiving email in Redmine at Redmine WIKI.
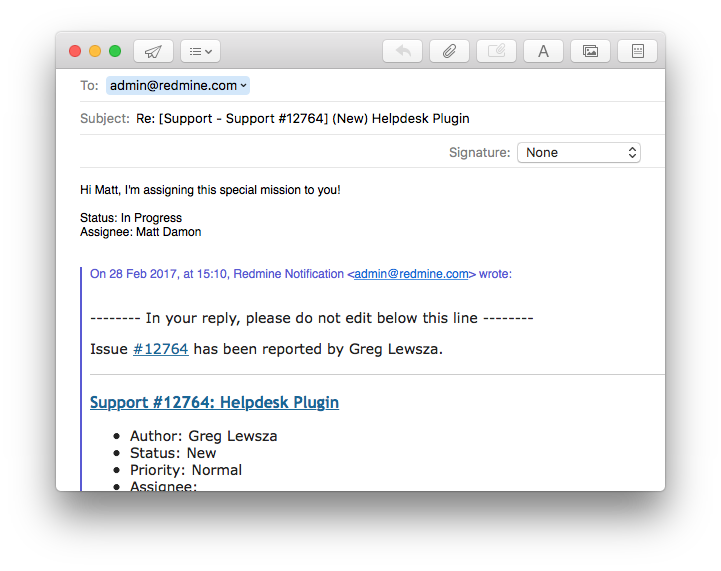
Once your email settings are set up correctly, we can sit down for the real fun! On default, if the issue you observe (by being on a watchlist or in CC) or is assigned to you is being updated, you will receive an email notification. Depending on your settings, it can include just basic information or many additional fields, for example,
- Author: XXX
- Status: AAA
- Priority: YYY
- Assignee: BBB
- Category: ZZZ
- Target version: CCC
If you just type something and send the email, it will be added as a comment to the selected case.
Now we come to the fun part! If you add the name of characters you want to change and the new value, it will update the issue.
Here’s the list of fields you can update by default. Please note that if you are using Redmine in a language other than English you need to give the name of the field exactly as it is labeled in the system, with spacing and to the letter.
- Project
- Tracker
- Category
- Priority
- Status
- Start date
- Due date
- Target version
- Estimated hours
- Done ratio
- [Custom field name]
How to use it? Just use it in the email body, and point out the new value [Characteristic]: [Value].
For example:
There’s no limit on how many fields you can update.
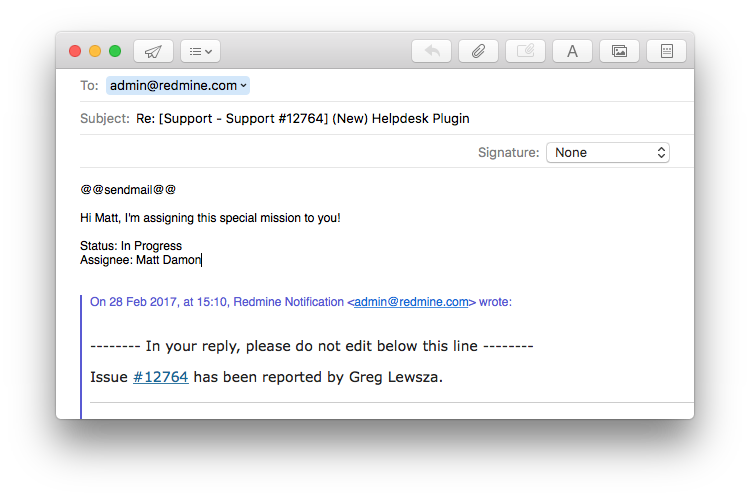
How to send emails and notes
If you also have the Helpdesk plugin installed, you can do this by simply replying to the notification you received. It will automatically update the issue and send the note to the person who created the issue (as well as its watchers). By default, this option is not active. To activate it, please go to Setting—Helpdesk Plugin settings—in the General tab, and tick the mark next to “Send note by default” field.
If you want to send only selected messages as emails, then by the end of the body add @@sendmail@@ command that way:
A few additional things to keep in mind:
- Keep the email subject as it is. Otherwise, it might not merge with the selected issue/ticket.
- To keep the emails shorter, follow the rule described in WIKI, and set the outgoing email header to—Reply above this line— (or some similar message) in the Email Notifications settings. Then in the Incoming Emails settings, enter the same line into the box labeled "Truncate emails after one of these lines.” After all, remember and remind users to reply above the specified line so that the changes are clearly visible and don’t get lost. If you need to quote a text, it is better to copy the text above the line.
- As long as they do not exceed the allowed size, all attachments will be added to issue
- In the Helpdesk plugin, there’s a new function available called "E-mail Dropbox.” It transforms any messages forwarded to default Redmine admin email address into an issue, including all attachments.
As always, we’re waiting for your comments and feedback! Share your ideas and what you would like to read next below.