- Install Dependencies and Database
- Installation of Ruby and Bundler
- Download and Set Redmine 7
- Install the needed Gems and Migrate the Database
- Troubleshooting
- Setting the Permissions and Start Application
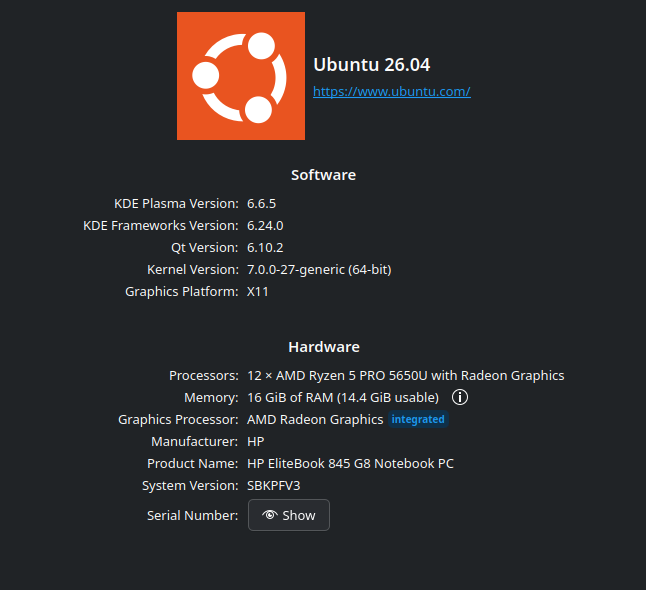
This guide will show you how to install Redmine 7 on Ubuntu 26.04. The Ubuntu Linux used for the installation could be checked below.
Installing the Redmine 7.0.0 requires a few specific steps because it relies on Ruby on Rails 8 and Ruby 4. The safest deployment on Ubuntu is to build from source, set up a MySQL/MariaDB database, and use Puma or Passenger with Nginx for production.
Install Dependencies and Database
Firstly, please update your Ubuntu package list and install the necessary system and database prerequisites via the following commands below:
sudo apt update && sudo apt upgrade -y

sudo apt install -y build-essential libmysqlclient-dev mysql-server wget curl git \
libssl-dev libreadline-dev zlib1g-dev libyaml-dev libffi-dev libxml2-dev libxslt1-dev
Afterward, secure your MySQL installation and create the Redmine database and user:
sudo mysql_secure_installation

sudo mysql -u root -p
Then in the MySQL shell, please run:
CREATE DATABASE redmine CHARACTER SET utf8mb4;

CREATE USER 'redmine'@'localhost' IDENTIFIED BY 'YOUR_STRONG_PASSWORD';

GRANT ALL PRIVILEGES ON redmine.* TO 'redmine'@'localhost';

FLUSH PRIVILEGES;

EXIT;
Installation of Ruby and Bundler
Redmine 7 requires Ruby. The easiest way to install a compatible Ruby version is by using a version manager like rbenv or Brightbox PPA. Please install Ruby, then Bundler:
sudo gem install bundler
Download and Set Redmine 7
Download the official source tarball file of Redmine 7.0.0, extract it, and then prepare the configuration files:
cd /var/www/html

sudo wget [direct link to the Redmine file located in https://redmine.org]

sudo tar -xvf redmine-7.0.0.tar.gz

sudo mv redmine-7.0.0 redmine

cd redmine
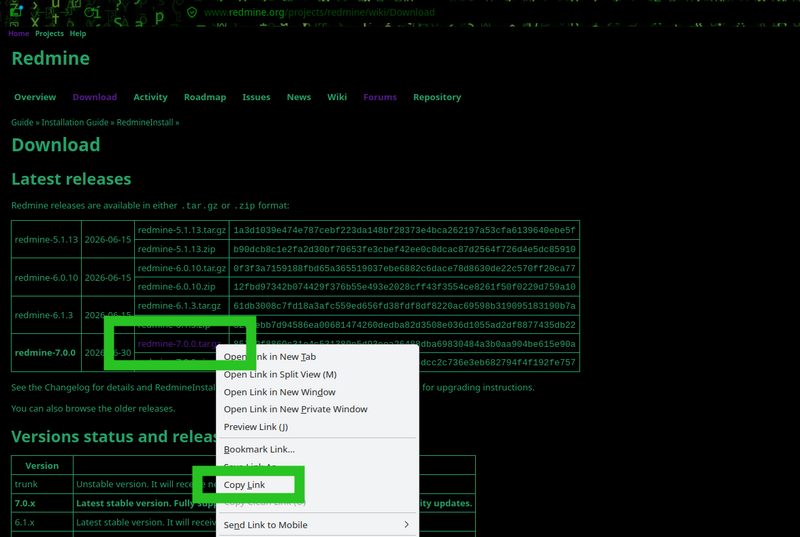
Note: In our example the exact link to download the Redmine 7.0.0 from the official site and the command accordingly is sudo wget https://www.redmine.org/releases/redmine-7.0.0.tar.gz, you have to just right click on the file and get the link as it is in the screenshot below.
Now copy the example database configuration and edit it to include your SQL credentials:
sudo cp config/database.yml.example config/database.yml

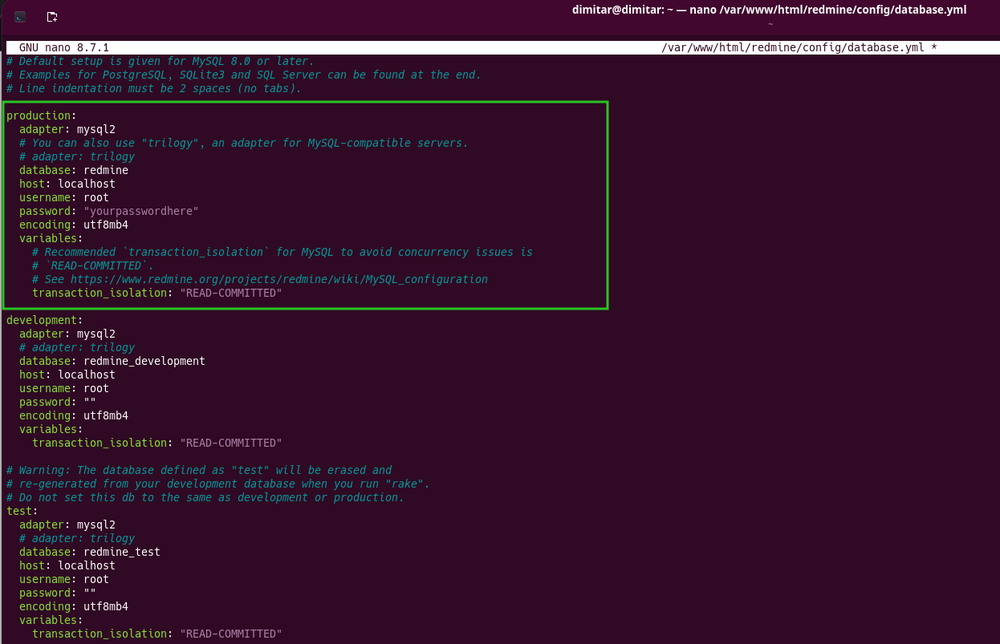
sudo nano config/database.yml
Under the production: please update the adapter, database, host, username, password, and set encoding: utf8mb4.
Install the needed Gems and Migrate the Database
This step is about installation of all required dependencies and initialize the Redmine database:
sudo bundle install --without development test

sudo bundle exec rake generate_secret_token

sudo bundle exec rake db:migrate RAILS_ENV=production

sudo bundle exec rake redmine:load_default_data RAILS_ENV=production
Troubleshooting
Important: Please check the below troubleshooting points in case you encounter the following problems.
- If you encountered this gem error:
An error occurred while installing bcrypt (3.1.22), and Bundler
cannot continue.
You have to install the specific gem version in this way:
dimitar@dimitar:/var/www/html/redmine$ sudo gem install bcrypt -v '3.1.22'
- In case you have similar with the above gem problem (in this situation the "date" gem):
An error occurred while installing date (3.5.1), and Bundler cannot
continue.

In Gemfile:
  rails was resolved to 8.1.3, which depends on
    actionmailbox was resolved to 8.1.3, which depends on
      mail was resolved to 2.9.1, which depends on
        net-imap was resolved to 0.6.4.1, which depends on
          date
You can just update the gem as follows below:
dimitar@dimitar:/var/www/html/redmine$ sudo bundle update date
- And regarding this error:
An error occurred while installing io-console (0.8.2), and Bundler
cannot continue.

In Gemfile:
  rails was resolved to 8.1.3, which depends on
    actiontext was resolved to 8.1.3, which depends on
      action_text-trix was resolved to 2.1.19, which depends on
        railties was resolved to 8.1.3, which depends on
          irb was resolved to 1.18.0, which depends on
            reline was resolved to 0.6.3, which depends on
              io-console
Please fix it in this way:
dimitar@dimitar:/var/www/html/redmine$ sudo bundle config set --local path 'vendor/bundle'
And finally run the bundle install command again to finish all the gem installations.
dimitar@dimitar:/var/www/html/redmine$ sudo bundle install
Afterward all the migration will run fine:
dimitar@dimitar:/var/www/html/redmine$ sudo bundle exec rake db:migrate RAILS_ENV=production
== 1 Setup: migrating =========================================================
-- create_table("attachments", {:options=>"ENGINE=InnoDB", :force=>true, :id=>:integer})
   -> 0.0156s
-- create_table("auth_sources", {:options=>"ENGINE=InnoDB", :force=>true, :id=>:integer})
   -> 0.0140s
-- create_table("custom_fields", {:options=>"ENGINE=InnoDB", :force=>true, :id=>:integer})
   -> 0.0140s
-- create_table("custom_fields_projects", {:options=>"ENGINE=InnoDB", :id=>false, :force=>true})
   -> 0.0131s
-- create_table("custom_fields_trackers", {:options=>"ENGINE=InnoDB", :id=>false, :force=>true})
   -> 0.0127s
-- create_table("custom_values", {:options=>"ENGINE=InnoDB", :force=>true, :id=>:integer})
   -> 0.0135s
-- create_table("documents", {:options=>"ENGINE=InnoDB", :force=>true, :id=>:integer})
........................
..............
.......
...
Setting the Permissions and Start Application
Please assign the correct folder permissions to the web server user (www-data):
sudo chown -R www-data:www-data files log tmp public/plugin_assets

sudo chmod -R 755 files log tmp public/plugin_assets
The way to start the built-in WEBrick or Puma server to verify if your installation works:
sudo bundle exec rails server -e production
The result in your terminal should be:
dimitar@dimitar:/var/www/html/redmine$ sudo bundle exec rails server -e production
=> Booting Puma
=> Rails 8.1.3 application starting in production
=> Run bin/rails server --help for more startup options
Puma starting in single mode...
* Puma version: 8.0.2 ("Into the Arena")
* Ruby version: ruby 3.3.8 (2025-04-09 revision b200bad6cd) [x86_64-linux-gnu]
*  Min threads: 0
*  Max threads: 5
*  Environment: production
*          PID: 2619799
* Listening on http://0.0.0.0:3000
..................
............
.....
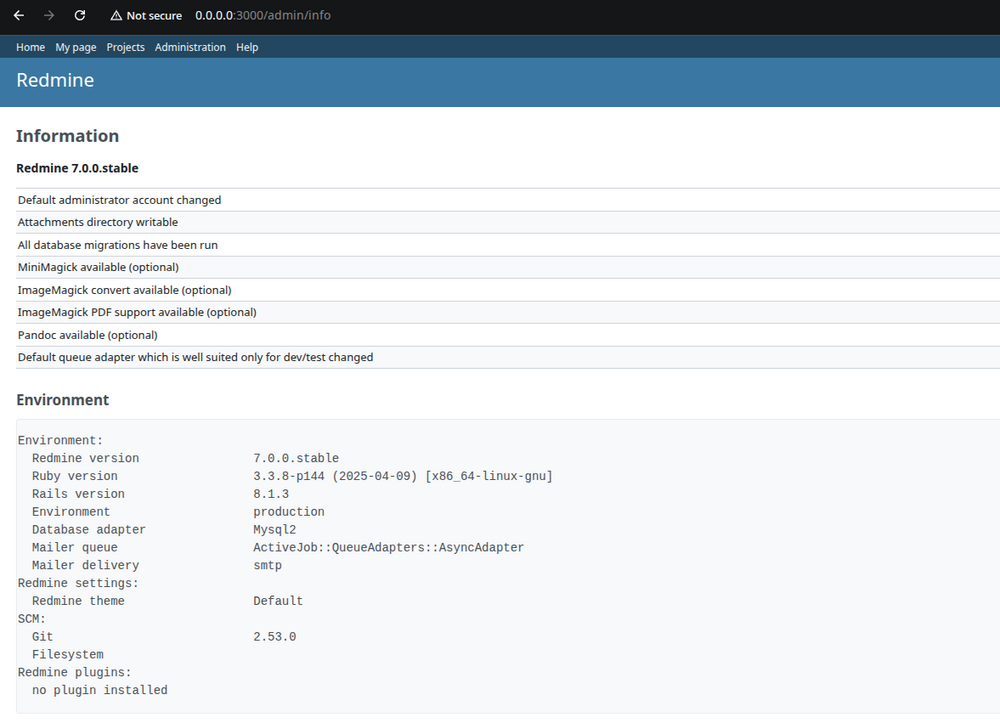
As you see in the above messages that followed the command in your terminal, you can now access your new Redmine 7 locally or via your server's IP on port 3000 (e.g., http://your-server-ip:3000). The default login is admin / admin. Screenshot reference of the working Redmine afterward could be checked below: