
This week we will discuss the Customer Support automation topic. In today’s Tip Tuesday post we will introduce you closer to a very functional item - Helpdesk widget. It can collect inquiries from ANY given website and turn them into tickets, acquiring ANY additional information. .
How does the Widget works?
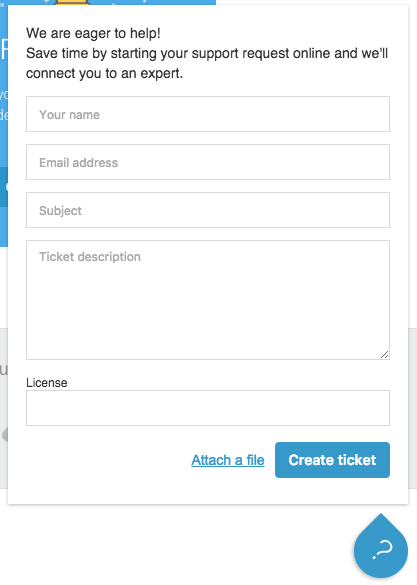
You must have noticed small round icon in the right bottom corner of our (or some other) website. Once clicked it opens a bubble with a short contact form. The user enters the data of his/her question or problem and clicks ’Send'. It automatically creates a new ticket with data from the widget - but this is not the end.
The widget is fully customizable, and thanks to REST API can be placed on any website of your choice - inside and outside Redmine, as well as on your corporate page, online shop and else. It can be added in any CMS, as long as you can insert script code into the page source.
Widget’s script can be placed on each page manually, to be visible only on selected pages. Of course, it can be visible on all pages if you install the code in the layout of the page, or, for instance, in its footer.
Now, let’s dive into more interesting facts. You can adjust the widget to match your webpage style, by applying your custom stylesheet, colors, icon. But there’s more. If you use localized page, you can add transactions to all labels and text hints, and show different versions for different languages.
Because widget can be installed on each page individually, you can adjust the number and content of the fields depending on the targeted market for example.
You can add any custom fields to the widget and select to pre-populate the fields with some values - like tracker, date, id. It can be used to pull out website name, URL, or any additional data you need. It uses Redmine logic and data, so you can also pull out data fro the user. For instance, if the user is logged in, you can automatically fill in the e-mail address and name fields taking the user’s data. As another example, for us to fasten the process of solving customer inquiries we use the "License number" as a custom field in our widget.
The widget can also be used as lead generation form or contact form to send pre-sale questions. You can choose to add product ID or some other values automatically. Or, let’s say you want to track your lead better - add Google Analytics’s ID and later see which pages the user have been interested in.
You can give a user choice to which product/service/project the ticket refers to.
How to set the widget up?
Just go to Administration -> Helpdesk Plugin Settings -> Widget tab. Here you select to which projects it will be available and which custom fields will be in use. If you want that the user will choose to which product or service the problem refers to, simply name your projects as products. The user will see the select list with the names indicated as in the Redmine. If you use the widget on external sites, please make sure the name is apparent to the user and not confusing.
In the Help area you see three sections of settings:
- Setting attributes - which refers to setting up primary attributes
- Color - the color of the widget bubble
- Attachment - if set to True, allows attaching the file to the ticket
- User_avatar - use to determine the avatar of the which use will be used as a Widget icon
- Title- the message on the top of the ticket form
- Position - select in which corner the widget will be displayed (on of 4 values/corners)
- Styles - add custom stylesheet here
- Translations - add translations if needed
- You can add translations to listed labels
- Identify - set up the texts and values that will be inserted in the fields on opening the widget
- Here you can add custom fields and its values that will be used on ticket sending
- Custom fields are hidden by default
<div id="helpdesk_widget"></div>
<script type="text/javascript" src="http://localhost:3000/helpdesk_widget/widget.js">
</script>
Default look:

The final code with additional settings can look as in the following example:
<div id="helpdesk_widget"></div>
<script type="text/javascript" src="http://localhost:3000/helpdesk_widget/widget.js">
</script>

<script>
  RedmineHelpdeskWidget.config({
    color: '#af1287',
    user_avatar: 'admin',
    translation: {
      nameLabel: 'Please enter your name here',
      emailLabel: 'Please write your email here',
      descriptionLabel: 'What question do you have?',
      createButtonLabel: 'Ask quesiton',
      createSuccessDescription: 'Thank you for your question!',
      createErrorLabel: 'Something went wrong :(...',
      subjectLabel: 'Subject',
      createSuccessLabel: 'Your question was successfully created'
    },
    identify: {
      nameValue: 'User',
      emailValue: 'test+1234@test.com',
      subjectValue: 'This is my question',
      trackerValue: 'Bug',
      projectValue: 'Support',
      customFieldValues: {
        'test': 'Field value'
      }
    },
    attachment: false,
    title: 'How can we help you?'
  });
</script>
"That's all folks". Please share in the comment section below, how many of you already uses the widget? We wait for your opinions and feedback on the widget.
In next post, we will continue with the topic of Custom Support Automation. If you have any insight on the topic or would like to contribute, we would be glad to hear from you!