Administration > Projects or Projects >
Projects can be managed by administrators, or in some cases by non-administrator users, depending on the permissions given. Projects can be created at two places: Administration > Projects (only by administrators) and Projects (from top menu).
To create a new project, press  .
.
Mandatory fields are Name (project name) and Identifier (identifier code used in the application databases and URLs; this code can’t be edited once the project is saved). After typing a project Name, an Identifier value may be generated automatically (depends on Project Default settings ), but it can still be edited before saving the new project.
Additional fields are listed below.
- Description: A short project resume that appears on the project overview page.
- Homepage: Link to the project homepage that also appears on the overview page
- Public: Check this to make the project public to non-member users and anonymous users.
- Subproject of: If creating a subproject, choose a parental project to assign to (if at least one project is already created).
- Inherit members: Check to add all members from the parental project (with their Roles set) automatically.
- Modules: Select which modules and plugins are to be added to the project.
- Trackers: Select trackers to be used in the project (affecting all project issues).
Note: All modules (except plugins) and trackers are selected by default. This may be changed by administrators at Administration > Settings > Projects - Project default settings. See Set Project defaults for more details.
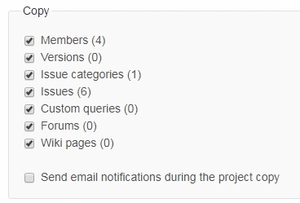
You can copy a project with all its settings to create a new project with another Name and Identifier (see images above). You can also copy members, versions, issues, etc., by checking in a list:
