Custom fields are used to expand the data attached to a unit (contact, issue, product, etc.) to suit your environment. For example, you can add a Purchase date field to your contacts (when they are also your customers), or a Vendor field to your products. Afterwards, the new field can be accessed when editing the unit.
Administration > Custom fields
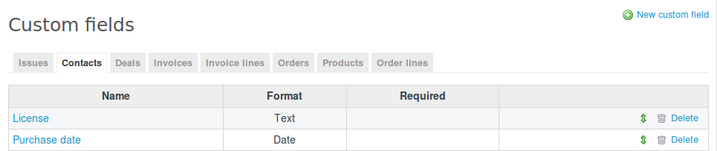
Here you have a list of all custom fields.
Create
To create a new one, click on  . You will see a list of options where you have to specify what will it belong to - Issues, Spent time, Projects, etc.
The second thing to set is Format. Options vary from simple text and number fields to checklists and users:
- Boolean: checkbox
- Company: company from your contact list
- Contact: any entry from the contact list (New)
- Date: date
- File: file
- Float: floating point number
- Integer: positive or negative number
- Key/value list: reference to a predefined list item
- Link: URL
- List: choice from a predefined list
- Long text: resizeable multiple lines of text
- Text: multiple lines text
- User: reference to a project member
- Version: reference to a project version
Every custom field must have a Name. A Description is optional.
Difference between List and Key/value list: In both you can create your own list of values which you want your users to add. However, a posteriori change in values of List type will not affect any existing records created in the past, while a change in values of Key/value list will also affect existing records created in the past.
Some validations can be defined for each custom field:
- Min - max length: minimum and maximum length for the field (0 means that there is no restriction).
- Regular Expression: a regular expression can be used to validate the field content. Examples:
- 4 capital letters followed by one or several digits:
^\[A-Z]{4}\d+$ - characters only, no digits:
^[^0-9]*$
- 4 capital letters followed by one or several digits:
Some fields support multiple values and default values:
- Multiple values: while enabled, more than one item may be selected.
- Possible values: possible values for the "List" fields.
- List: Use one line of the textbox for each value you want to specify.
- Key/value list: Press Edit and add, rearrange, edit values one by one.
- Default value: default value to apply if none selected (if it is a list, must be one of the Possible values).
Some fields support text formatting.
- Text formatting: whether to wikify the text. If enabled, then locks the Link values to URL field.
- %value%: the custom field value
- %id%: id of the customized object
- %project_id%: id of the project of the customized object if defined
- %project_identifier%: identifier of the project of the customized object if defined
- %m1%, %m2%... : capture groups matches of the custom field regexp if defined
For example, if you set this to https://www.yourRedmineDomain.org/issues/%value%, the field values will have a link to the issue in your Redmine which has the same id as the value.
Display specifies how multiple options will be accessible.
Allowed extensions is used to limit acceptable file types. Leave empty to allow all files.
To the right you will see (a subset of) the following options:
- Required makes the field mandatory;
- Visible causes the field to be displayed in the user profile;
- Editable makes the field editable by the Redmine user owning the user account;
- Used as a filter enables you to browse entries based on the content of this custom field;
- Show in list enables you to add a column for this field to the table of entries(while viewing the list of entities, in Options menu right above it, you have to switch the List style to "Table" and than you can specify which columns it should consist of);
- Searchable causes the Redmine search feature(initiated by the field at the top right of the page) to include contents of this field.
You might also see the following sets:
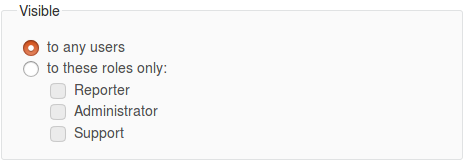
Use this to specify who will be able to inspect the field.
![]()
Depending on this option the field will only appear for selected issue types.

Depending on this option the field will only appear in selected projects.
Click save to confirm creation.
Edit and Delete
Clicking on a field name allows you to edit all options, except the format. You can change the custom fields' order of appearance by clicking and dragging the  icon to the right. Next to it is also the button to
  .
.
Note: Deleting a field also purges all data saved in that field accross Redmine and is irreversible!