- A Condition is a check on
- An Action is a change on
- How to set multiple email addresses in the condition fields?
- Override the ticket author
Automatic processing rules can change ticket attributes if certain conditions are met. For example, you can put a High priority on messages from a specific client or containing the word "urgent". Or move the ticket to another project if an email came from a particular client or domain.
To manage these rules, go to Administration -> Plugins, find Redmine Helpdesk plugin and press Configure. Go to the Email rules tab.
To create a new one, press  . First, specify whether the rule would be applied to Incoming or Outgoing messages. Checking Manually will cause an additional button to appear with which to apply the rule.
- Conditions (at least one, must be met for the rule to apply) and
- Actions (at least one, what to do in those cases).
A Condition is a check on
- the Message type, whether it is an initial message or a response in a chain;
- the message's Subject, Tags (only if ticket type is "answer"), From address or Body;
In Subject, you can also match a regular expression (regex). For example:
-
\d{6,}matches any digit sequence with at least 5 digits, -hello[^\.]*redminematches any string of characters that begins withhello, ends withredmineand does not have a.inbetween. - the Contact who sent/will receive the message or the Tags thеreof. Multiple Contact tags can be specified, separated by a
,(comma).
An Action is a change on
- the ticket's Assignee, Issue status, Priority or Tags; If the ticket's status is already as it is to be set the action will not be performed.
- the Contact tags of the sender/receiver contact;
- the Project this ticket belongs to.
To make changes to an already existing rule, press  .
.
To delete a rule, press  .
.
FAQ: What is the Stop handling action about? In this case, the Helpdesk doesn't apply any rules below it.
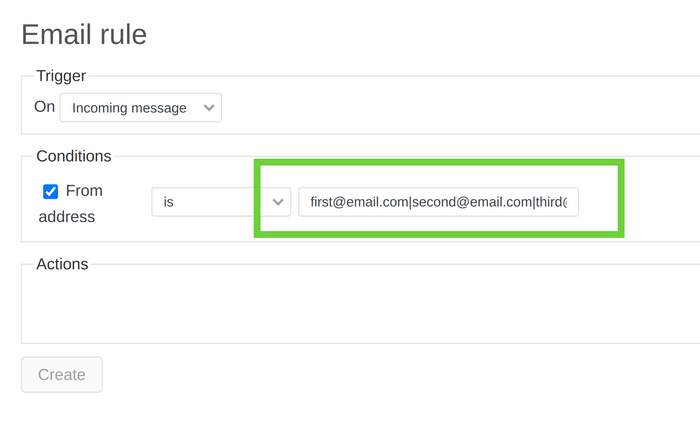
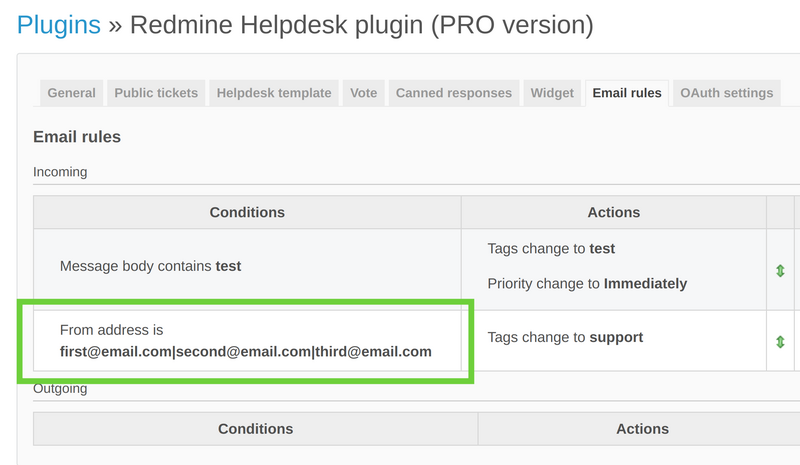
How to set multiple email addresses in the condition fields?
To make it available you need to split the email addresses with the '|' symbol without spaces, please check the below example to make the situation clear:
first@email.com|second@email.com|third@email.com...
Also, you may check the below screenshot references to see how it should look like.
When creating the condition:
And when it is saved:
Override the ticket author
This mail rule action lets you override the ticket author by extracting an email address from the body of the incoming email using the pattern ##user@domain.com##
How it works:
1. When an incoming email is received, the rule scans the email body for the first occurrence of ##...## and extracts the email address inside.
2. The plugin then looks up a Contact in the CRM database matching that email.
3. If a matching Contact is found, the ticket's author (customer) is reassigned to that Contact.
Note: Important security detail: The rule only works with existing Contacts. If the email inside ##...## does not match any Contact already in your CRM database, the action is silently skipped — the ticket keeps the original sender as the author. This is an intentional anti-spam safeguard: it prevents arbitrary users from being injected as ticket authors..